
Dictate anywhere
Click a text field, hold your Push to Talk shortcut, speak, then release. Speakmac inserts the transcript at the cursor.
In 5.7.3, wait for processing and delivery to finish before starting another dictation. Keep your intended writing field focused until the transcript arrives. Paste and auto-send use the field focused at delivery. Changing auto-send during processing applies to that dictation, including after Undo restores a cancellation.
Hold
Speak
Text appears
Send Maya the revised note today.
Fn is the default on a fresh setup. If your shortcut is different, use the one shown in Dictation → Shortcuts.
For a full stop in English, say “period”, “dot” or “full stop”. In 5.7.3, “point” no longer invokes a full stop, preserving ordinary phrases and spoken decimals.
Names that dictation gets wrong
Open Words & Text → Custom words → Add. Enter the exact name or term; leave Correct a misspelling off unless you want a replacement pair. In 5.6.0, eligible words can help the new Fast engine recognise the term itself. Your existing corrections still work.
Vocabulary words and corrections explainedLive Preview is optional in Dictation. If its model download fails, Try again opens the app with progress and error details; final transcription can still work without the preview.
Clean Up Dictation
Use Clean Up when you want rough spoken English to arrive as a readable message, note, or email.
What you said
so yeah send the revised note to maya today and um ask if friday still works
What lands
Send the revised note to Maya today. Ask if Friday still works.
In Speakmac: Dictation Clean Up Dictation Set Up
For the best local English result, choose More Accurate and keep Clean Up on. More Accurate recognises the words; Clean Up finishes punctuation, fillers, and paragraphs. Expect a small extra wait.
The model downloads once, then Clean Up runs on this Mac. It currently supports English.
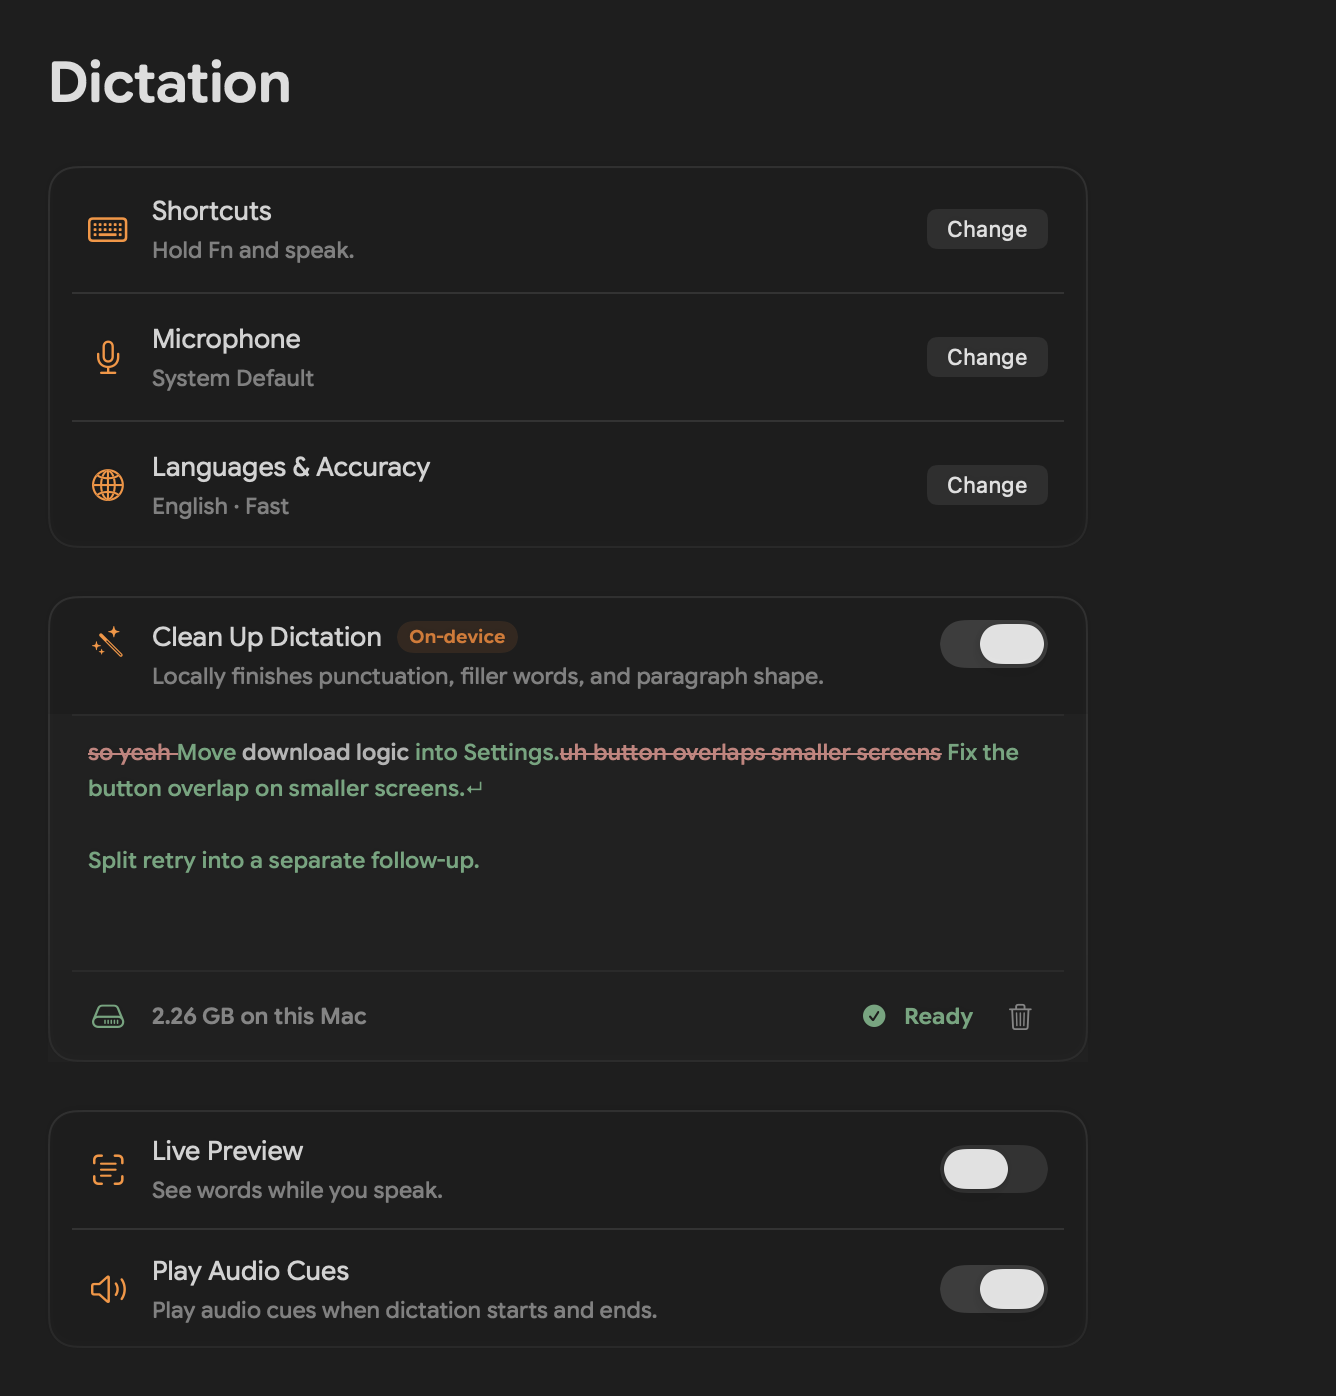
Shortcuts
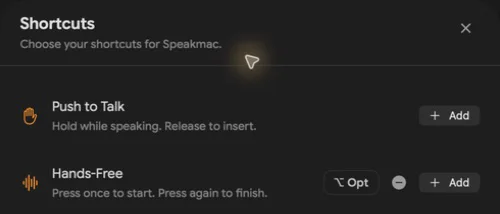
Give quick dictation and longer hands-free dictation separate controls. Fn and Right Option are two simple examples.
Push to Talk
Hold while speaking. Release to insert. Best for replies and short notes.
Hands-Free
Press once to start. Press again to stop. Best for longer messages and drafts.
In Speakmac: Dictation Shortcuts
If you used Space to keep recording
Old habit
Hold dictation key → press Space → keep talking
Use now
Press Hands-Free → talk → press it again
Space is not a universal lock action. If that was part of your workflow, add a dedicated Hands-Free shortcut instead.
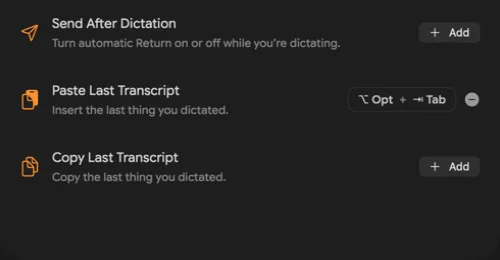
Actions worth assigning
| Action | Use it when |
|---|---|
| Send After Dictation | The text should be inserted and Return pressed automatically. |
| Paste Last Transcript | The last dictation exists, but it did not land at the cursor. |
| Copy Last Transcript | You want the last dictation on the clipboard without changing the current field. |
Record a meeting
Meeting Mode records your microphone and the Mac’s system audio locally. It does not add a bot to the call.
- Open Meetings and choose Start recording.
- The first time, choose Enable beside System audio and allow it in macOS. Reopen Speakmac if macOS asks.
- Choose Start Recording. Stop it in Speakmac when the conversation ends.
Beta · macOS 15 or later · five trial recordings, then a paid Speakmac licence. Discarded recordings count toward the trial. A confirmed no-speech result returns its trial credit. Tell participants before recording.
Pause, resume and finish
Use Pause/Resume and Stop in the recording footer. The floating indicator has Stop and an arrow that opens the active meeting. These controls replace the separate Scribe menu. Open an active recording from its card in Meetings or the first menu-bar entry.
With Stop when a call ends enabled, a recording started from a meeting suggestion pauses when Speakmac detects that the call is over. Choose Keep recording in the notice, or Resume in the footer, to continue before the countdown finishes. Otherwise Speakmac stops and prepares the transcript. Manually started recordings remain under your control.
Keep your recording if transcription fails
Speakmac saves received microphone and system audio before preparing the transcript. If processing fails, open the saved meeting and choose More → Retry Transcription. Any saved text stays available to read, search, copy and edit.
Choose More → Show Recording in Finder to access the audio yourself. New recordings also retain original audio chunks, which use more storage than the playback file alone. Keep these files if you want to retry or process the recording elsewhere.
An incomplete-recording notice means some audio was missing or could not be saved. Retry can process the audio that remains; it cannot recreate words the microphone or Mac never delivered.
A no-speech notice offers Keep or Discard. Keep closes the notice and retains the recording in Meetings; it replaces the old Review action. Discard asks for confirmation before deleting the recording. Other completed-recording notices have an Open action; a failed start can offer Retry.
The orange and blue sections on the meeting seek bar show the dominant speaker source over broad intervals. Hover to see Mostly You or Mostly Others, then click to seek. These sections provide a rough navigation map; the transcript keeps its original speaker labels and timing.
In Speakmac: Meetings Start recording Pause/Resume or Stop
Keep Saved in Meetings
Discard Confirm deletion
Microphones
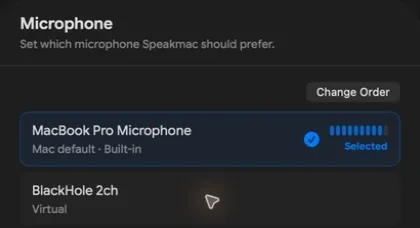
There are two useful controls: choose the microphone Speakmac should use, then put your fallbacks in order.
Choose a microphone
Open Dictation → Microphone and select the input you want now.
Set the fallback order
Choose Change Order and drag the microphone you trust most to the top. A disconnected mic stays saved and becomes available again when it reconnects.
Quiet audio or missing words?
- Check the headset mute button and make sure Speakmac has the microphone you intend to use.
- Open System Settings → Sound → Input. Select that microphone and adjust Input volume a little at a time, if the control is available. Headphone listening volume is a separate setting.
- Record a short sentence and listen back. A moving level meter shows that sound is arriving; it does not guarantee clear speech.
- If you use a USB receiver, try a direct Mac port. If the headset supports Bluetooth, compare the same sentence over that connection. Neither connection is always better.
For a step-by-step check of microphone levels, connections and permissions, follow the microphone troubleshooting guide.
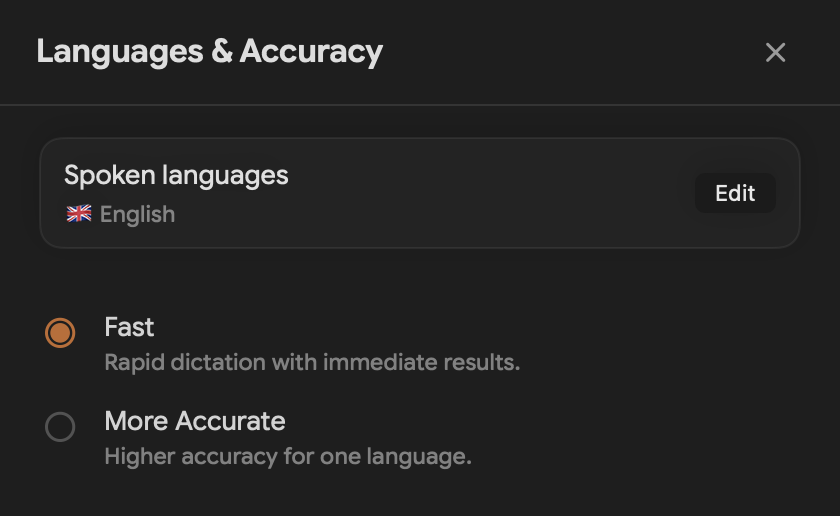
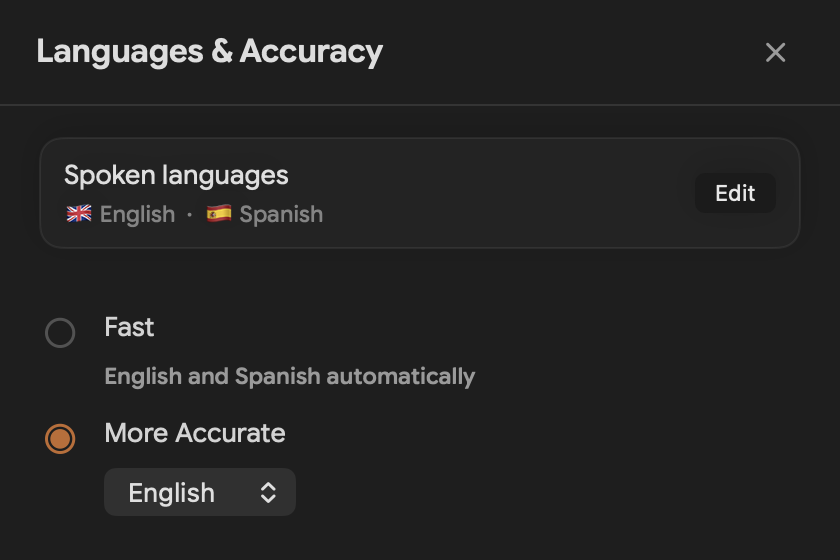
Languages & Accuracy
Choose the result you need. The settings use plain choices instead of asking you to understand model names.
| Choice | Use it for | What to expect |
|---|---|---|
| Fast | Everyday dictation and automatic language handling | Immediate results |
| More Accurate | Careful dictation in one supported language | A little more setup and time |
In Speakmac: Dictation Languages & Accuracy
Get the last transcript back
If recording finished but the text did not appear, recover it before saying everything again.
Copy or paste the last transcript
Use the menu-bar action or the optional shortcut you set in Shortcuts.
Undo a cancellation
After Escape cancels recording or processing, choose Undo while the cancellation message is visible. Speakmac resumes from the saved audio without opening the main app. This recovery is unavailable when audio is discarded for privacy.
Open Dictations for anything older
Search the words you remember, then hover a dated entry to copy its text or open More. Choose More → Play audio to replay a saved recording. Use the seek bar to move through it and Play/Pause to control playback; the old inline play and five-second skip buttons have been removed. Play audio is unavailable when the saved audio file is missing.
Retry only when processing failed
Keep the source until you have checked the result.
Privacy Mode intentionally keeps no local History, so these recovery paths may be unavailable for those sessions.
In Speakmac: Dictations Entry’s More menu Play audio Seek or Play/Pause
Transcribe an audio file
Use an existing recording instead of recording it again through the microphone.
Drag it into Speakmac
Drop a file from Finder onto the Speakmac window.
Or use Open With
Control-click the file in Finder and choose Open With → Speakmac.
The item appears in History. Keep the original until you have checked the transcript.
Updates & compatibility
Use Speakmac’s own update action. You do not need to hunt for another installer.
- Open the Speakmac app menu and choose Check for Updates.
- To receive updates in the background, leave Keep Speakmac up to date automatically on in Settings. Turn it off when you want Speakmac to check, download, and install only after you choose Check for Updates.
- When an update is available, follow the in-app update flow.
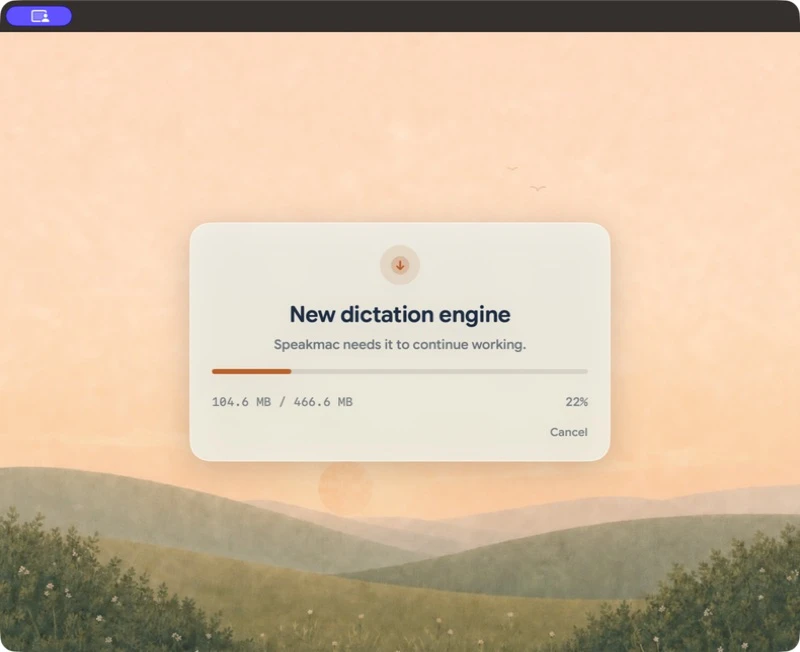
- In 5.6.0, some Macs also need the new dictation engine. Choose Update in the engine prompt, or Download on Home. Finish this one-time model download before dictating.
- After updating, run one short dictation and check your shortcuts, microphone order, and Clean Up state.
App update → Engine download → Ready → Dictate
The model setup screen shows the size for your Mac and its progress. A small patch can reuse verified old files; otherwise Speakmac downloads the full model. If setup fails, reconnect and choose Try again. Closing or cancelling does not skip the required setup.
The previous model is removed only after a successful real dictation with the new engine. Your existing words and settings stay in place.
Troubleshooting
Check the stage that failed instead of changing every setting at once.
| What happened | Check this first |
|---|---|
| The shortcut does nothing | Confirm the binding in Shortcuts, then confirm Accessibility permission and remove any app shortcut conflict. |
| Recording starts but hears nothing | Choose a connected microphone and confirm its level moves. |
| A transcript exists but does not insert | Copy or paste the last transcript, then try a normal editable field to isolate an app-specific insertion problem. |
| The other side of a meeting is missing | Enable system audio and reopen Speakmac if macOS asked for it. |
Still blocked? Email [email protected] with the Speakmac version, macOS version, target app, shortcut, and whether the transcript appears in History.